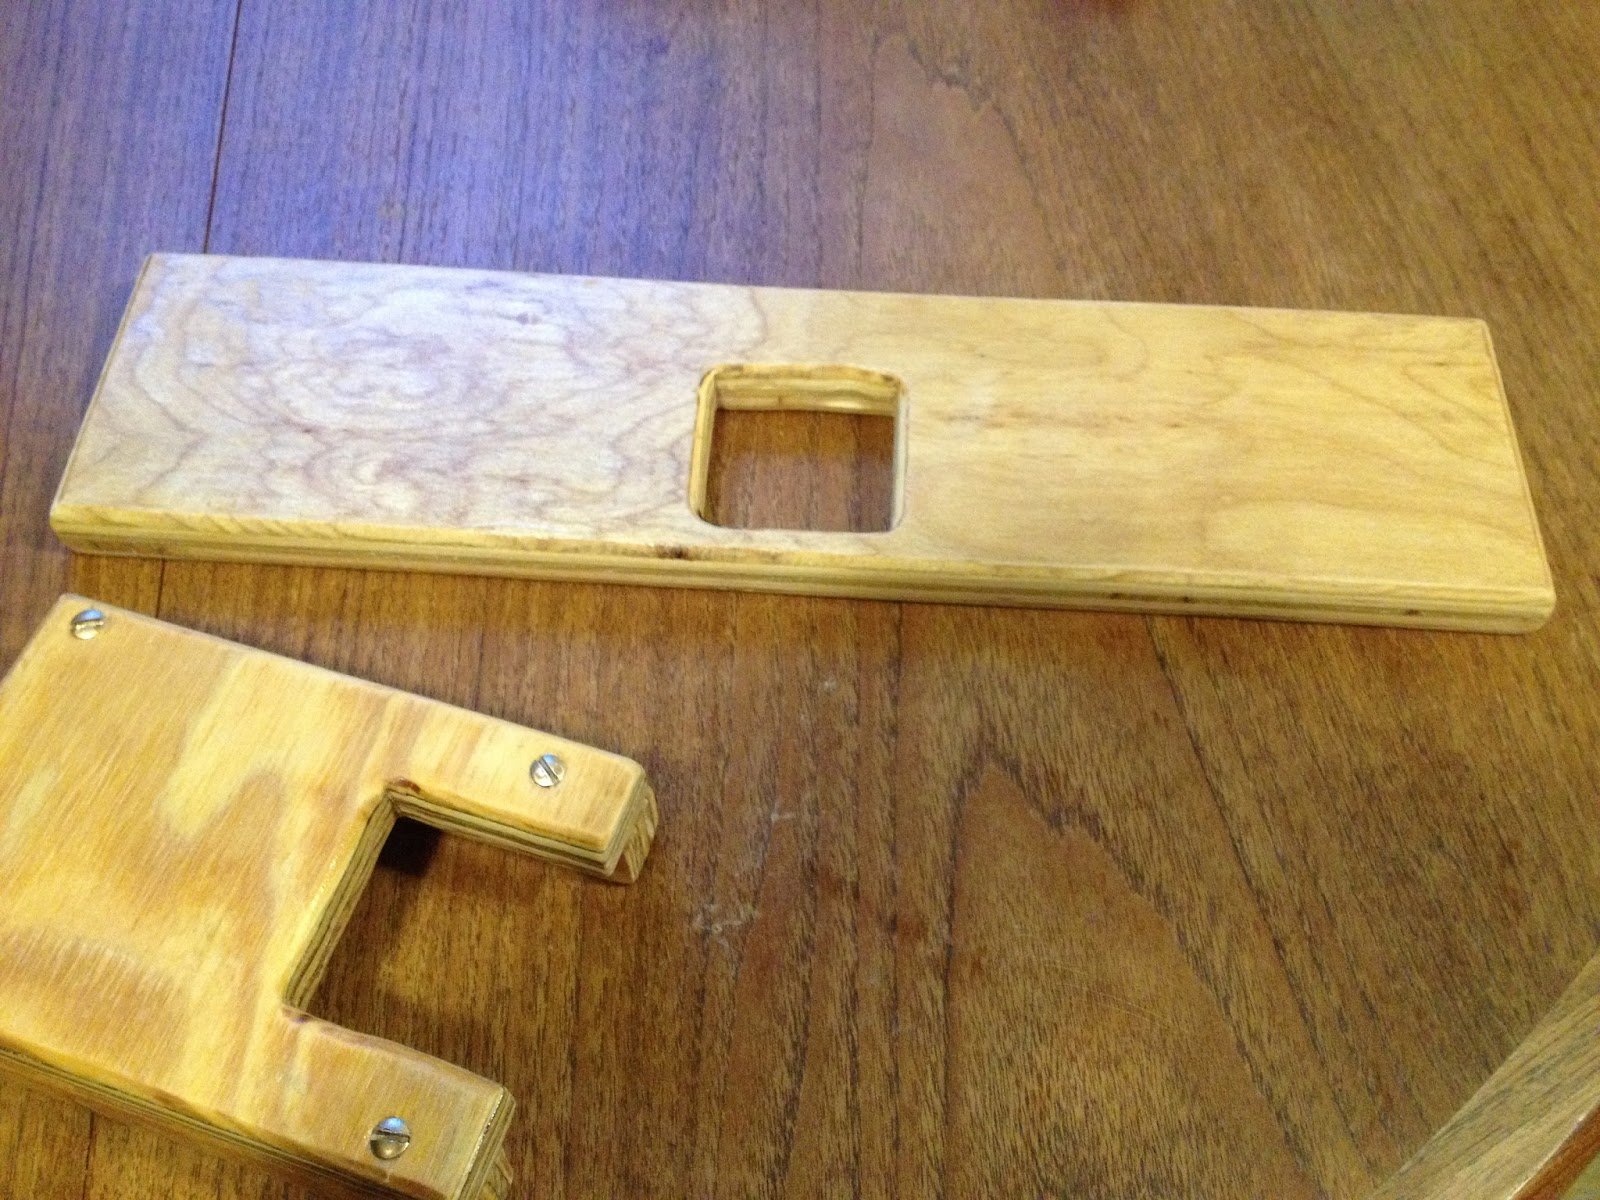
It has been quite some time since I wrote last and a lot has gone on, though sadly, not a ton in my boating world. Of key note though, as of the last few weeks, I've been preparing the dinghy for some epoxy fixes and measuring everything needed to install the sailing modifications. As a quick preview, here are some pieces epoxied and ready to be installed on the dinghy.
Mast step screwed and glued together.
The doubler for the mast partner.
I have a handful of things to finish still and I am hoping the boat has dried out enough so that I can fill some leaks we found under the rear seat. If I am lucky, I'll fill the leak with thickened epoxy this Friday and take her out for a row Saturday after it has dried. We will see! It's a little challenging working on her since I have left the boat 4hr away at my parent's house. At least this way I have access to power tools and can work inside. Anyway, a more complete update soon!
If you have any questions or ideas for modifying an original Passagemaker Take-apart into the Lug rig version, feel free to comment!
I am sad to say that I have become almost entirely
a sofa sailor as of late. Luckily for me, my library is overflowing
with good reads and how-to books that I feel I’m not just wasting away,
away from the sea. I still feel the draw, dwell on my memories of sailing and
the dream of being out on the water again, but we can’t always be messing about
on boats.
I have many other hobbies though too,
and more recently I have been spending a bunch of time on the other big one,
board gaming. I take gaming seriously (to my wife’s distaste) and I probably
enjoy playing board games too much. I have dabbled in game design for years,
but have never had any designs I liked enough to try and progress it much past
a first prototype. Don’t worry; this is where sailing comes in. Over the last
few months I have been reading Hornblower, learning and practicing celestial
navigation, and trying to design a new game. I have always thought a celestial
navigation game would be awesome, so I had been playing around with random
ideas of that sort for some time. Anyway, I’d been dreaming about Stars, taking
sights, and gaming when it hit me one morning. I woke up, sketched out a design
and eureka! Within a few hours I had made a constellation recognition game. It
really stunk… well, sort of stunk, but I kept with it, combining game mechanics
I liked with the British Navy theme I was so inspired by. And after many months
of playing and handfuls of revisions, I finally have a game I am proud of. So
proud in fact, that I am releasing my idea into the world for the rest of you
to see.
The name of the game is As Seen in
the Sky, which was my original codename (I give all my games temporary codenames when I start them), and I have a fantastic team of artists helping me
out. I don’t talk about this to too many people, but the internet feels like a
safe place, so here you are readers! If you are into gaming and sailing, I’d
love to hear your thoughts. There is a little bit of information on Board GameGeek (a great site for Game Addicts) that will continue to trickle in as we
talk to manufacturers and finish all the art. And since you are here, I’ll give
you a little taste of the art development over-time. It has been a project of
love and I’m hoping you enjoy it as much as I have.
My initial design for the tiles
Initial Examples for tiles from the artists
Artists' first example of player board cards, box cover design, and constellation cards based on my description to them.
Second round player board card from the artists
I'll add more posts with game development content as time goes on, but I don't want to spoil anything. The art here is not final and many of the pieces have changed since we started, but it's a nice taste of what is to come!
Saddly, this is not the type of sail setting that I might hope to be doing on this fine summer day, but it is one more project off my list. I have been playing with my sail for the Passagemaker Dinghy for the last few months, doing an hours work here and there, and it is finally complete. The "set sail" I'm talking about is lacing the sail to the booms that I built a few months back.
I was lucky enough that the kit was available from Sailrite already, and with a couple extra bits for some fun, it came in at a bit under $250. The laying out and sewing of the sail took something around 15-16 hours, including all my mess-ups. Add to that another hour or two to grommet and an hour to hand sew on the leather corners. So for say, 20 hours of work, I saved myself $350 over buying a new sail. Money well saved I say! Plus, my sail (when truly complete) will have some nice custom detailing!!
Kit pieces ready to go.
The instructions provided by Sailrite were pretty fantastic, and the fact that everything is in there less the sewing machine and grommeting tools made the project seem less daunting. Using the material sparingly as I am prone to do, I even have a ton of extra double sided tape and some unopened thread.
To start out, I built the reef and corner patches with double sided tape, making sure to minimize the amount of bubbling that occurs (my later ones looked best). I sewed those in place and then sewed the hem and edge tape on the luff and leach panel. It asked for both 2" and 3" tape, which I added simultaneously. After those were finished, I cut and sewed the diamond intermediate reef patches. With all the little bits on, it was time to sew the panels together.
Sewing patches onto the sail panels.
The starting panels were pretty straight forward, and I taped and sewed pairs of panels together. To finish things off, I started on the longest panels and worked my way toward the luff, adding each pair sequentially and sewing in a manner as to always rolling up the pair of panels being added. This kept the largest portion flat and moving outside of the machine. I felt like a lion tamer trying to keep the sail edging forward in my all-but-too-small of a living room sail loft. Worse still was taping the head and foot. I used the tube the material came wrapped around, with a half inch slit cut the whole length of one side, as a clamp around the sail roll to help tame the beast, but it did not stop the sail from slipping and sliding in a not-so-straight fashion.
One panel finished with all patches attached.
The final taping and sewing was hard on the machine. At some spots, particularly on the corner patches, there were up to 12 layers of cloth or more, and I ended up bending a needle. I hand-turned the machine afterwards over all of the reinforced areas. There was some issue with tension on one of the runs, but I left the unflattering zig-less-zag at the head of the sail rather than pulling all the stitches and redoing that section. It looks strong enough not to be an issue and if it ever is, it's in an easy enough position to fix in the future.
Blurry as heck, but one pair of panels sewn together.
The kit came with leather for the corners, and though I have never seen this on a sail, who am I to say what is and isn't normal for a lug rig. I was able to make 1 hole with the needle provided, but it took me 30 mins, and figuring that I had at least 20 per corner, I decided to find a better way. Using a board and some regular medium sized nails, I tacked the sewing pattern I wanted through all layers of the material. I ended up rounding over the leather (since they provided plenty) making 2 layers per side, but also giving a cleaner finish to the edge. I was able to nail out my sewing pattern and sewing up the work on three edges before I broke the first leather needle. So I waited a week for some new needles to come in (in addition to a sewing awl, and extra grommets for my 2nd reef point setup) before finishing the last corner. The sewing awl, a Speedy Stitcher, worked very well, though it was hard to push 2 layers of thread through with it. Anyway, though this was time consuming, it does give a nice finish to the corners.
Ready to grommet... the corners have been covered in leather.
The last pieces of the puzzle was adding in the #0 and #3 grommets. The #3s went in with a cheap 7/16" grommet anvil kit from Walmart, which did a very nice job, but their 1/4" kit was junk and just pancaked the heck out of the two grommets I tried. I purchased the appropriate kit size #0 kit and was again disappointed with how poorly it worked on the small grommets. at least 2 of the grommets cut out a small section of the cloth between it, and none of the nickel sail grommets look fully punched as I seem to get with the junk grommets that come with the kit. Alas, the task is done.
I googled sail lacing to figure out how it is to be done, and settled on a method that looked cool and "will produce less drag aloft." To be honest, I can't see me trying to race this rig, I just thought it looked pretty cool. I used 325 paracord, about 1/8" line, to lace the sail to the booms. I added reefing nettles (the line in the reef patches) made of glow in the dark 550 parachute cord (3/16"), with the hope that it will make them easier to see if the need arises after dark. I'm not sure if I tied the corners correct, but one is connected through the lacing, the other is independent so that I can adjust the tension. We will see how it works out.
Different lacing patterns, I tried the one on the far right to start.
The last thing to do is raise sail.... or I guess I could go grab the dinghy and install the mast.
I finally have time again for projects and one that I have had sitting for a while was my safety tether. I looked at grabbing some for a long trip last summer and they were crazy expensive.... I mean around $100-$200 for clips and nylon webbing. I don't know about you, but that's just crazy in my book. If I can trust my own splicing to hold my boat at anchor in a 30 knot blow on an open river, I think I'd trust my sewing machine and it's sail thread. Plus, why not make a cool custom tether that fits me?
Well, I did just that. Components wise, I bought my webbing from Strapworks (I like their site, and if they want to pay me to advertise for them, I'd do it! [but they don't]), using 1" tubular polyester, which is stronger and more abrasion resistant than nylon, and 3/8" elastic. I also bought fancy ribbon on webbing for the quick release handles, 1ft each. I bought a lot... like 9ft of webbing in both colors (I built a pair of tethers) and 12ft of elastic. Then I found some climbing carabiners that had a permanent webbing loop, they are called "quick draws". I picked mine up from an english company and amazon and were $12-$14 shipped for each set (DMM is the manufacturer). I also saw a different brand at REI yesterday for $16, so they are easy enough to come by. Lastly, I picked up two quick release clip with rings on Ebay in an auction for $6 shipped, and I think they may have been used to airdrop tanks... but I'm ok with overkill. The total for supplies for two tethers came to just under $50.
5ft and 3ft hook
The original design was to have 2 independent tethers coming off the central quick release clip, that would hook into your harness. This is what most of the 2-hook tethers have. I decided against that once I got everything situated, because I didn't want to be whacked with the second tether or have to have 2 hooked up all the time. So instead, I placed one hook at about 3ft and one at about 5ft. The 3ft tether is what I would use on the foredeck and the 5ft lets me go from the cockpit to the foredeck without ever being disconnected. I saw a video of folks testing tethers and decided shorter was better. The length will keep my on the boat even if I fall, not dragging in the water, which looks like a safe bet to me.
Red with Jolly Roger
Pink "Smoke" and Paw Prints
As far as sewing is concerned, I just made sure to have 3 vertical and 3 horizontal zigzags securing every hook minimum. I also put some fun patterns in after the fact... because I could. First, I pulled the elastic through the webbing using a marker with the elastic trapped on one end in the cap. Then, I secured the elastic with a 2" zigzag stitch down the center, after pulling it tight so as to have it fully extended when initially sewn. Finally, I sewed both clips at their desired length and cleaned up with the quick release. And that was about it, it took less then 30 mins a piece for each tether and the weakest part is the webbing, which is rated to 1800lbs... and I don't expect to survive anything that does that to my body anyway, so I'd say we are good to go.
Feeding the elastic
As a side note now that I've completed the project, I think that using regular 1" polyester webbing without elastic is well worth it... the stretch vs non-stretch is less that 4" over the 5 foot length of my finished product (though the wobbly webbing does look cool).
I said I'd show some boat photos from last weekends visit to Keith's shop, and here they are. Keith is about 6 months into his build, with all of the bulkheads up, and he put on the top plank (I'm not sure the official name of it) the week I visited. He plans on putting the bottom two planks on the boat, then finish the interior from outside the vessel, before finishing the planking. If you ask me, it looks like one hell of a boat!
Starboard overhead view, my new mast on the floor.
The Passagemaker Dinghy I bought was not designed for the lug rig that I want to install on her, but luckily the modifications should not be to rough. I still have not collected the vessel from my friend, but some parts of this project will be do-able without ever seeing the vessel. Since I have a bit more free time now, I decided to get another piece of the project completed, the rig.
I have never built anything out of wood before that I expected to survive at sea. Luckily enough, I know an amazing carpenter, Keith, who has a love for sailing and has built his own vessel (and is currently building another). With his instructions in hand, I ran over to my local building supply store to find myself a board that would do the trick. They had what looked like a good selection, plus they were the only place within an hours drive that sold wood.
The Instructions
"Look for a board that has straight grain running the length of the board, not diagonally across, with tight grain. Also, if you can find one that is cut out of the middle of the tree with the pith in it instead of the edge of the tree, (look at the grain on the end of the board for the rings to go the short way across the end of the board, instead of from edge to edge or diagonally.) We don’t need the whole thing, so some wane or a couple of small knots are ok if the rest of the board is good. Don’t get anything that is cupped or twisted or really crooked. Stand at the end of the board and sight down one edge and you will be able to see if it is straight and flat, or curvy and twisted. Get Red Fir (Douglas Fir), they will call it Fir / Larch at the lumber store. Also, if you have a choice get a lighter board over a heavier board, you don’t need any extra weight aloft. Larch is very heavy. You will probably have to look at a dozen or two boards before you find a really good one, but it is well worth the trouble."
Well, it was no easy feat finding something that fell close to his description and I am sure I looked a fool to the folks working at the store. I was hoping to get a 2" by 12" by 12' board, so I had plenty of extra wiggle room, but there was nothing close to acceptable in that range of board. We looked at the 14' and 16' boards, but the only boards that looked good were on the bottom of the pile and I didn't want to move the 20 boards on top to check them. Amanda picked out a nice 2" by 10" by 12' and it happened to be the best piece we found. It didn't give us much room for error, but for $11.70 I figured I could go back for another one (preferably from another store) if we needed more.
This past weekend I popped over to Keith's shop, took the tour (I'll post pictures of his current vessel project soon) and then we got down to business. The booms were easy, cutting the best straight sections out of the 12' board, 1.5" wide. The mast was a little trickier, as boards are not actually cut to the size they claim (the board is less than 2" thick), so we took the best 2" wide sections out of what was left.
Cutting out the boom, gaff, and both sections of the mast from the raw board.
The two mast sections had the least attractive side planed to prepare them for gluing. We then used a quick-drying glue and put two directions worth of clamps every few inches to keep the seam tight the whole length and the beam straight. Once it was glued up, we had plenty of time to take care of the boom and gaff while we waited for the glue to set.
Planing both halves of the mast.
The mast all glued up and clamped.
Next, we found the best 8' section on each of the spares and made quick work of shortening them with a reciprocal saw. The plans call for a bevel of both of the spares (boom and gaff are identical in this lug rig), decreasing from 1.5" to 1" on the bottom of each boom, over the last 20" of both ends. Easy enough, we marked the line with a square edge (big "L" shaped ruler) and cut off the material with a band saw. We hand planed the cut sections to smooth out the transition and then took a router to all four long edges. After that all that was left was installing the holes at each end with a drill press, two rounds of the electric sander (at 80 grit and 120 grit), and finally hand sanding with 220 grit (to remove the electric sander marks and finish the surface).
Hand planing the gaff and boom
Planing the gaff and boom.
Testing the router for depth and size.
The mast was cut down to size, removing material from only one side (to maximize strength should the glue ever fail at sea), and then we used the router to round all four long edges. Sadly, the first time we gave this a go, the beam separated along the seam (it wasn't warm enough for the glue to set). We reglued and parts that came loose and filled in the slight openings in the seam with wood glue, then clamped the mast for the night. In the morning, all that was left to do was round the remaining edges, drill a hole at the peak for the halyard, and sand.
All in all the project probably only took 3 hours, of which 50% of that time was sanding. I must say though, they do look pretty! I still need to varnish them, but I'm currently trying to figure out what product the dinghy was varnished with, in hopes of matching the color. I'll add the finished photos as soon as I get the varnishing complete. All I have to say is that it was far easier than I expected and it was really fun! So what are you waiting for? Go out and start building a boat!
I have been overwhelmingly busy the last few months; writing, reading, and writing some more, but it has all paid off. Today marks my graduation from school... forever. It's not like my high school graduation, with the plan to continue onto college. Or my college graduation which was just a precursor for graduate school. I am graduating into the real world. Also different than before, I can finally not go to the ceremony, which has been my desire for each one past. Oh the joys of truly being an adult! I am not sure if it is common, but I have been in school continuously for 25 years. Not too bad for 3 pieces of paper...
I've actually been done for a month (to the day), having defended my dissertation and getting my "official" hand-shake on November 12th. Since then I've had plenty of time to fix and refix issues with my dissertation (which was accepted on the 7th), visit my parents in Pennsylvania, and play around with future projects. At some point in the near future I will be heading back to Pennsylvania to work at the University of Pittsburgh, but that is for a later post. For now, let's get into some background on the boat-related project I've been toying with.
I can't remember if I've posted, but a few weeks after selling White Raven we purchased a completed Chesapeake Light Craft Passagemaker Take-apart rowing dinghy (I am not affiliated; I just think their boat kits are cool). Now, rowing may sound like fun, but I'm into the "hanging out on a sailboat" thing more, so heaven knows I'm planning to convert this vessel into a sailing ship. She is currently located at a friend's house... in Florida... so of course the work on the vessel is a little out of reach currently, but I've been busy with other things. I bought a Sailrite lugsail kit (~$250, way less than the $600 for a pre-made sail) and put together the sail (mostly) the weekend after my dissertation. I will post more after I finish the sail but a mockup of what it will look like in the end is below.
A mockup of my sail on the lug rig Passagemaker, with a very small human model.
I wish I could say that I finished, but I have to do/redo the 3 rows of stitching on the edge material on the head of the sail, sew the 3 rows on the bottom of the sail, add the leather to the corners, and place grommets in all positions. All in all the project was pretty easy, though frustrating on occasion, and has taken me maybe 8-10 hrs so far. (Side note: I may have broken the sewing machine I was using while trying to go through 12 layers of sail cloth). It would have been nice to have a large work area, but I built it on the floor of our living room, which is less than half the size of the finished sail. I also modified the 1 reef kit I bought to incorporate a design I found on Wooden Boat Forum for a second diagonal reef, which turns the lug into a lateen rig, picture below.
Depicted is a standing lug reefing arrangement that keeps the center of effort at the same point on the vessel, but I am trying it on a balanced lug rig.
Anyway, I've felt bad not posting, even if my wife is my only reader. As I get closer to putting everything together, or have time to finish the sail (which are currently in Pennsylvania), I will update more. If you read this and happen to live/sail in Pittsburgh, send me a shout out. I will be hunting down a way to sail on the river after I get to town.
Amanda and I took a vacation to the Oregon coast for the weekend. We visited friends in and around Portland, enjoyed the Rose City Comic Con, and camped at Fort Stevens on the coast for a few nights. We wanted to make the trip in case our East coast transition happens sooner than expected. With school coming to a close, but still enough time to see folks and places, it was a must-do this past weekend.
We spent a day in Astoria, perusing the used book stores and the waterfront. We came across a museum that was more than we wanted to spend per person, but there were some coastguard cruisers hanging out behind it and we had a look. I also wanted to go to the marina to look at the sailboats, but compromised to go to the docks on our way back to the campsite. Lucky for us, we went to the only marina we needed to see.
Amanda standing in front of the display anchor outside of the maritime museum
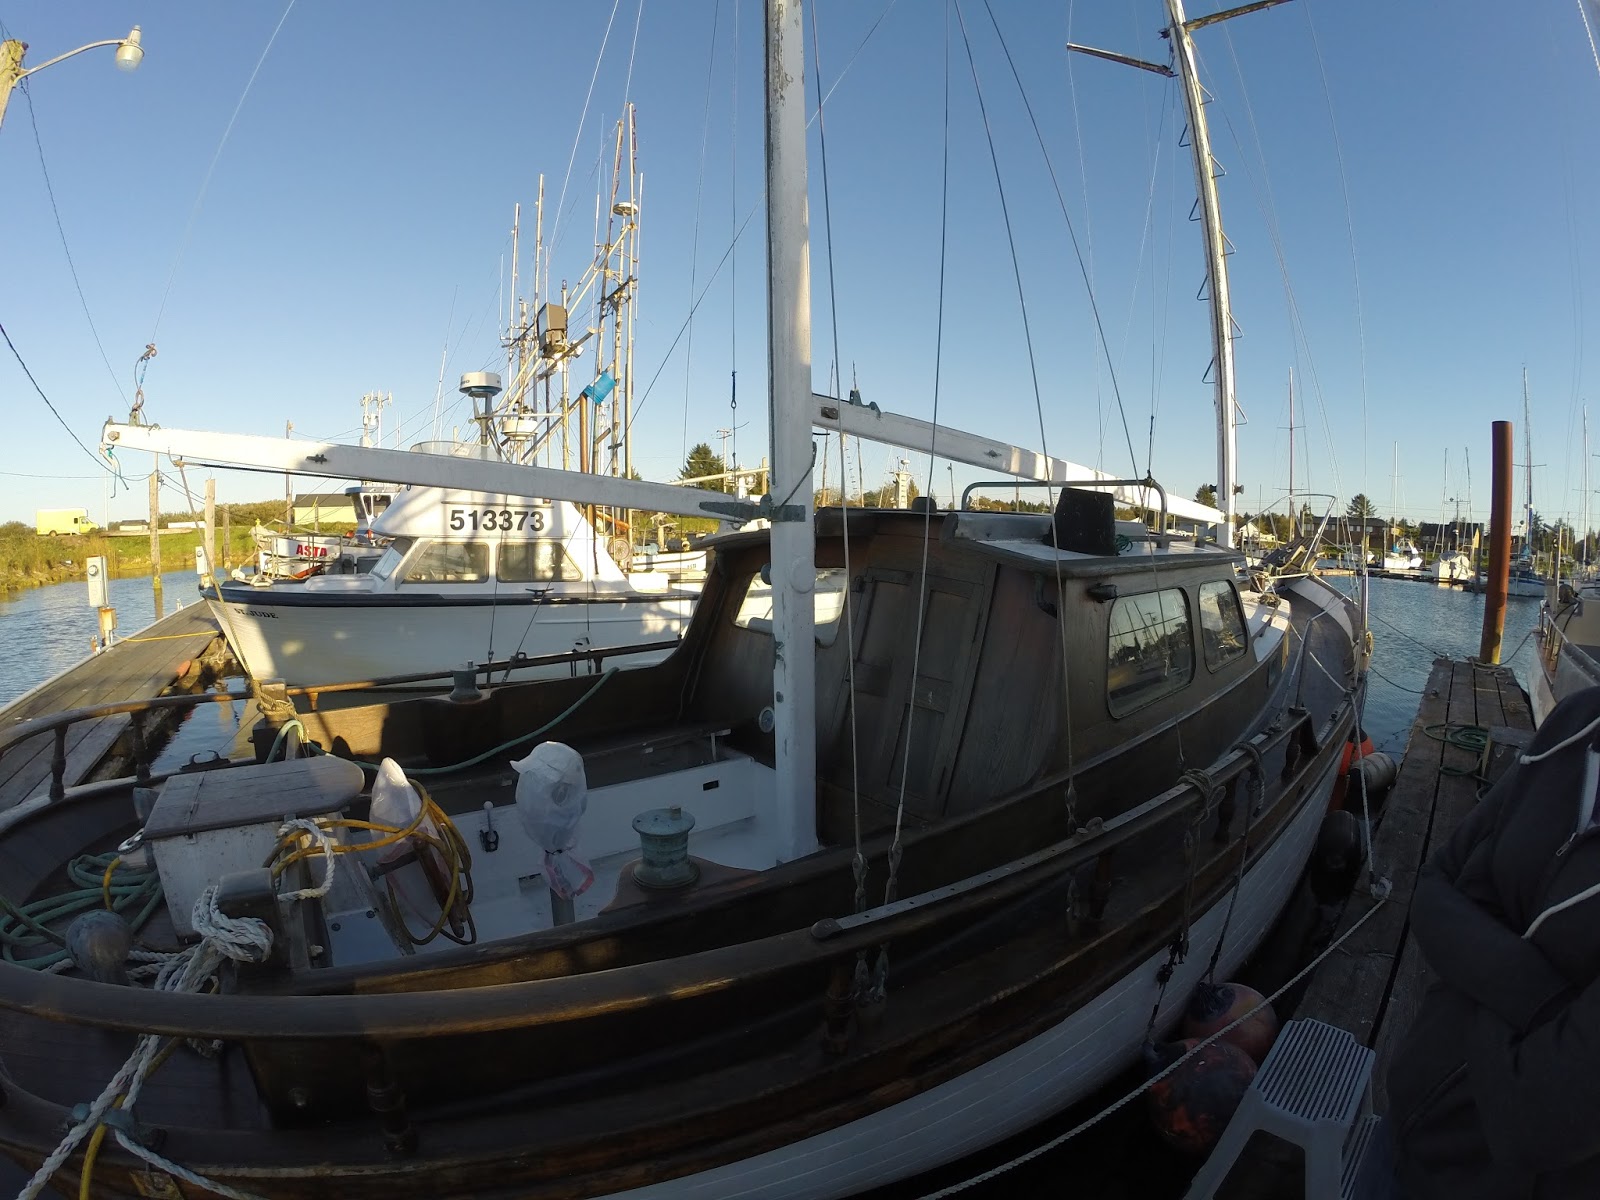
Back in Hammond, Oregon we pulled off into the public marina parking lot, parked, and headed to stroll the docks and look at all the marvelous vessels. To my surprise, I saw a familiar visage on the far dock, a spitting image of the photo Cynthia sent me. The masts looked wrong, with mast steps up the main that made it look like aluminum, but the figurehead and doghouse were unmistakable. Amanda, mocking me as I started power walking trying to find a way to the dock to get a better look, said, “I’ve never seen you move so fast before!”
“I swear it’s a Fung-built Walloon!” I replied as I hurried around the maze of docks. I was a man on a mission. “What are the odds that we come to the right dock? Only 40 were ever built, and out of those who knows how many are still surviving!” Back in 2014, around the time we purchased Drumbeat, I saw one Walloon schooner for sale up in Vancouver, BC. Beyond that, I haven’t been able to find any information on other surviving vessels.
Look at our find!
Nice transom!
Finally I found the correct entrance, and sure enough it was a Walloon! The Snow Queen out of Portland, undergoing what looked like a refit project. Even so, she looked beautiful. I’m not sure if she is a sister ship of Drumbeat (12 were ordered by the Navy, one of which was Drumbeat) or her cousin. Either way, what a find! We walked around her dock and reminisced about our visit with Drumbeat. Snow Queen looked a lot less intimidating than Drumbeat did, but we were seeing her in her element, swimming in saltwater, around other enormous vessels. I think this was reaffirming for Amanda that it wouldn't be an insurmountable project, sailing her or fixing her up.
The bow of Snow Queen
Amidship
I also discovered my GoPro microphone was shot. I thought it was because of the waterproof housing that all I ever heard was static, but alas it is the device itself. So again, there is no audio, but here is a short video of our find. As for other information, it is a Robin Fung built vessel, launched in 1967. We left a note in, I'm sorry to say, a used peanut butter and jelly sandwich bag, poking out of a cockpit seat and hopefully well-enough secured. I'm hoping to hear back from the person currently restoring her.
Well, I'm sad to say it, but I lost a good friend today. I'll never forget the first time I took White Raven out to sail, or the first time I actually made it off the dock with the boat. Sailing in the rain under main alone, I felt like the world held no bounds for me anymore. She taught me so much about myself, gave me confidence to go along with my academic knowledge of sailing, and took care of me when the weather got rough. I understand that a boat is just an object, a tool, a toy, but I know that vessels have feeling deep down in my heart. White Raven may be just a boat to the rest of you, but I think we had something between us. The rumble of her keel when she'd get up to hull speed, letting me know she was happy. The whistling of her rigging when the breeze was just right, egging me to push her just a little more. Her content as she gently swayed while lying at anchor. Plastic, iron, aluminum, and wood: they may have no soul as individual parts, but when combined to birth White Raven, they became alive.
Amanda running the helm on our first sail with White Raven.
Though I am sad to have let her go, she went to a good home. Jim met us along the river this morning in the lull of the wind. We set up White Raven for the last time, launched her and fiddled with the motor a bit. The motor ran, though was still having the issue of not idling. It sounded like Jim had assessed the problem, a leaking manifold seal. I'm going to take his word for it. After waiting for some motor boats to launch, we raised sail and spun the boat for a straight shoot off the dock. And with the motor in gear, we were off downriver. Rather than waiting for the wind to get to us, we motored around the bend until we came upon some slightly disturbed water. Though only slightly rippling, it was the only breeze that could be seen on the otherwise glassy expanse.
Stopping and raising the motor, we lazily enjoyed the little puffs that came about. Tacking back and forth in the fluky air left plenty of time for stories and to get to know each other better. Jim told us about his sailing career with his last boat, a San Juan 21. It's nice to know that I am not the only one who feels like I'm always learning. I'm really glad I held the boat for Jim; I've put White Raven in more capable hands than my own. The day was going along quite pleasantly, and then something abnormal happened: the weather forecast was turning out to be true. The wind started backing, allowing us to run before the incoming storm. Lucky for us too, as the breeze started building quickly.
We ran, wing on wing as much as could be done. The wind kept shifting a bit from WNW to W and would send the jib scurrying behind the main as we ran. With a strong shift northwest, we jibed, and I quickly caught the boom as it was passing, to ease it over to the other side. The tiller became heavy and responsive; I could feel the power lifting us along and I felt free in the moment. The wind began to pick up to about 15 knots, and White Raven was humming away even without the jib assisting effectively. As the wind picked up a bit more I eased the main out slightly and we decided to drop the jib. Jim moved to the bow, uncleated the jib halyard and eased the jib down into the forepeak. The breeze heightened. Again I eased out the main to the very end of the sheet and turned to have the wind coming more abeam. Lucky for us, it was a straight shot for home. The wind was pushing us easily at hull speed, even with as inefficient of a rig as I could muster while still aiming to port, so I dropped the motor to increase our drag. Onward we pushed toward the dock.
One good thing about low river levels, poorly maintained marinas, and a swing keel is being able to ease yourself into a mud near the edge of the dock. At 5.5ft clearance, we were about 1.5ft too deep to make it over the sandbar, so I aided our stop with the river bed. This made dropping the main a breeze without needing to turn into the wind. Once we stopped, I handed Jim the tiller and I went on deck and released the main. I really had to help get her down with the breeze as strong as it was; inch by inch at first, then foot by foot I dropped it into the companionway. Once that job was done it was down to releasing the keel bolt and raising the keel to free us from the bottom. I think that was the first point when I started to feel nervous: cocooned by the damp dripping mainsail, easing the keel winch back and forth to release the bolt. I felt trapped under the sail and that combined with the rocking of the boat, by wave and wind, made me feel disoriented under there. But I freed her and once I felt the change in motion, I quickly added a few more turns to the winch and jumped back on deck. We were now a drift, heading slowly toward the dock and a motor boat waiting to be lifted back onto its trailer. I ran to the bow, grabbed the bow line and guided Jim toward the dock. We came in with a bit of a thud, but I stopped the with about ten foot buffer between us and the motor boat. All in all, I'd say it was a successful sail.
It was awkward seeing the trailer backing down the ramp on Jim's SUV, but it sat nicely in the water without being drowned like when my van is towing. I jumped into the water and guided her back onto her pads for the last time, tossed Amanda the dock line to realign the stern and held her in place while Jim took her out of the water. I was in a sad reflection as I packed up the boat for the last time, easing down the mast and lashing everything down. The worst of the wind lashed out about then, but we were comfortably cradled on the trailer and the mast was already battened down for the long haul to White Raven's new home. Then it was just down to a few signatures and that was it: White Raven was no longer ours.
Trying to seem impressive, as if the drizzle was a storm along the Cape.
I was a bit sulky the rest of the day, but I knew I couldn't keep her. Life is moving forward for Amanda and me. There have been talks of job opportunities, moving on to what comes next, and of course dissertations to write. The sailing season is over now for me, but maybe I'll be on Drumbeat for the next. I am really happy that the last sail was a good one - you always want to leave on a good note.
I wonder what the best way is to break the news to your boat that you've decided to sell her, to give her a new home. Maybe it's similar to having to give away a pet when you go off to college or when some other cog shifts in the machine of life. I've no experience in that department, but maybe it would go something like this:
Dear White Raven,
I want you to know you are one great vessel. At thirty-four years old you're still going strong, and by gosh, your gel coat doesn't look a day over ten years old! You've taught me so much over the last few years. You've kept me dry when the winds blew their hardest, rocked me to sleep when we were out on the hook, and brought me places that can only be reached by water. There is no telling how much you have changed my life, but soon I will be leaving and I can't take you with me.
Now that I am finishing up with school, I'll have to move, and I won't be able bring you along for the adventure. I also don't want you to have to waste your young spirit waiting for me on your trailer. Have no fear; that will not be your fate. I've found a nice home for you with a fine caretaker. His name is Jim and he sounds like a very nice and experienced sailor. I promise he'll have you out and about over on the other side of the state. That's right - new hunting grounds for the choicest winds, fresh water to rub your hull in, and different muds to run your keel into. I promise not to tell him how good we are at sitting in mud along the river. And don't worry, you won't have to wait too much longer; we'll go out for one last jaunt when you meet him this coming Sunday.
I know that all the maintenance on your engine makes sense now. I can't have you going off without giving the old carb a good once over. Lucky for you, he'll probably show you a few new tricks that a lubber such as myself has yet to learn. You'll do fine out there in the Tri-Cities, and as long as you treat Jim as well as you have me, I promise he'll take right good care of you. This will be a hard goodbye, but it will be for the best. I want you to know I'll never forget you.
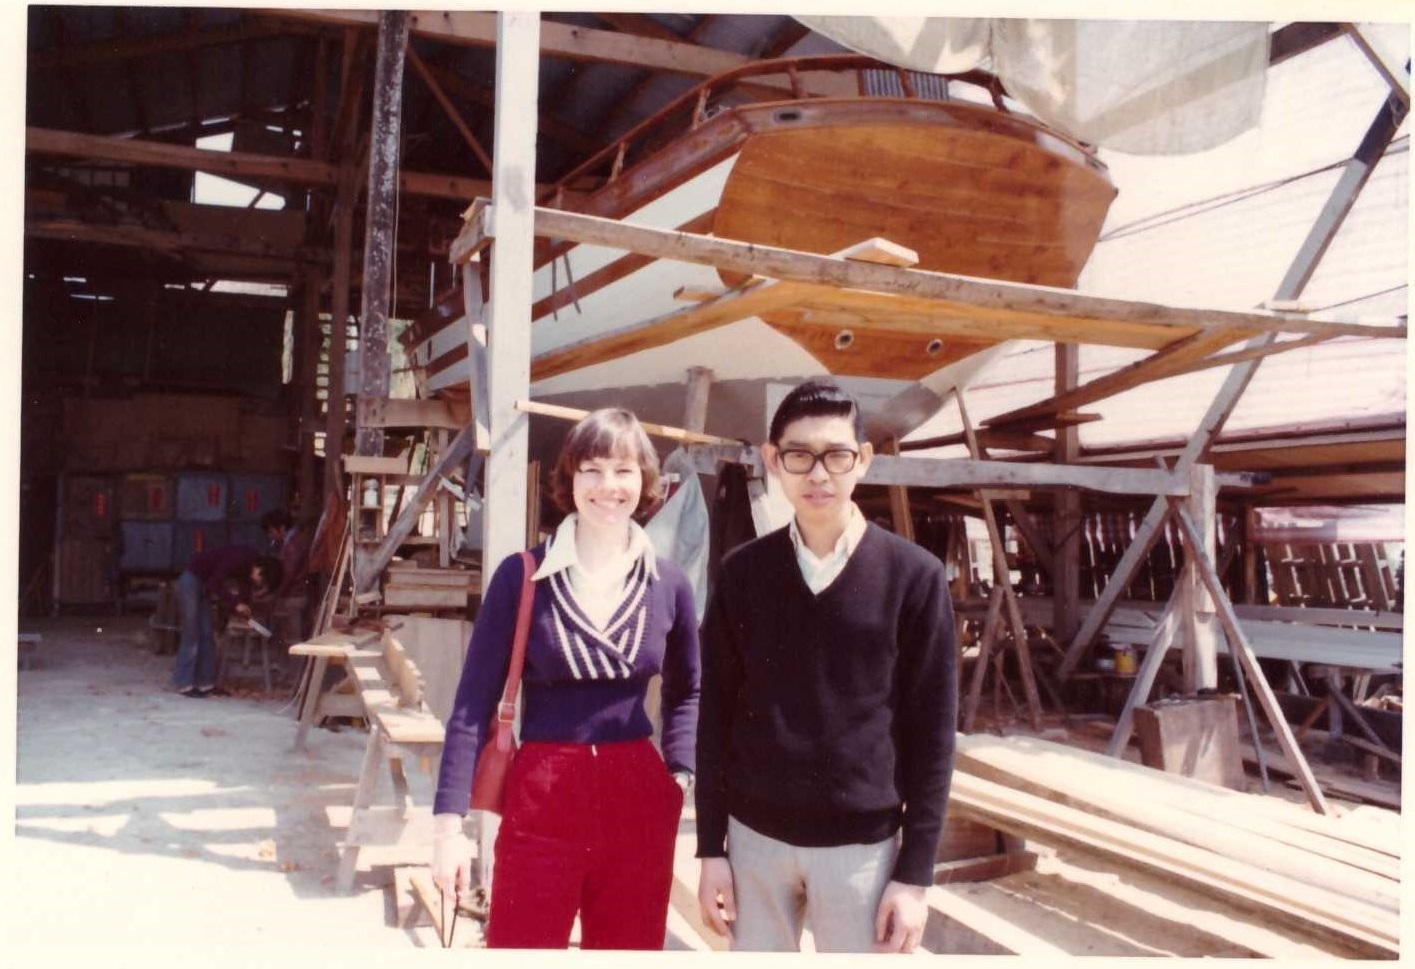
The hunt is never ending as I search for and log Drumbeat's long history. Luckily, there is a small group of sailors that have been inspired by her as much as I have. One of those individuals is Cynthia, Drumbeat's second owner. She only was able to hold onto Drumbeat for a few years, but the relationship built in that time frame has lasted. In 1973, she was able to visit the builder who had the commission to build Drumbeat along with a series of other vessels. Here is a glimpse of that trip.
Outside the boat shed in Ping Chau
Her story and trip inspired me to delve deeper into the life of Robin Fung, owner of R. Fung Company, the builder of Drumbeat. Sadly, Robin is not around to answer my questions and tell me stories of his amazing team of craftsmen, but I've been able to piece together bits and pieces from many sources (including Drumbeat's log book) and will present my findings here as accurately as I can. I want to clarify that though some of this information is unrefuted fact, some may be conjecture, but I have done my best with my sources at hand.
Robin Fung
To start at the beginning, Robin Fung was born in Hong Kong in 1929 into a well-off entrepreneurial family. The younger of two sons, he could have taken over the family business, but instead persuaded his dreams to be a pilot. He moved to Miami and graduated aviation school in 1950. While he was in the United States he developed a love for sailing, which was attributed to the family that he rented from during his schooling. Unbeknownst to them, they would inspire a legend in the crafting of these vessels.
Mr. Fung returned to Hong Kong soon after graduation and obtained employment with the Foshing Airline company out of Taiwan. His family and the owner of Foshing were good friends, and he was able to work for Foshing for a few years. Sadly, this was not to last for long with tensions between China and Taiwan still steaming. With urging from his family, Robin was let go and went searching for other employment opportunities. He found his calling though, and started R. Fung Co. Ltd.
In his time there was an army of shipwrights in the area to feed the booming post-war leisure industry. Alongside the great names of the era, such as Cheoy Lee, Wing on Shing, and other lesser yacht builders, Robin set up shop. The craftsmanship coming out of his workshop was incredible, being performed completely by hand and to the highest standard. As a testament to this, Drumbeat has no broken frame or working planks, and even original decks that don't leak after 46 years of service. Fung was known for building William Garden designs: Foam, Wanderbird, and Porpoise, to name a few. He built mostly on speculation, though he did build some vessels to order (such as Drumbeat). In 1970, a fire ravaged his boat works along with a few others, destroying two nearly complete vessels that were not insured. It has been speculated that the fire was set by the Cheoy Lee company to remove their competition from the market.
Fung was relocated to Ping Chau by the government and he sold everything he had to rebuild the vessels that were lost in the fire. It was the most intense trauma his family had to endure, but he held his professional ethics at a very high standard. Ping Chau was only accessible by ferry, being such a small island off the coast of Hong Kong. This caused great challenges for the business, as his employees could only work half days so that they could use the ferry system. Eventually, the cost of doing business on Ping Chau became too high. Robin attempted to reclaim the land where his original business had been located, but the government would not allow him to return and he was forced to stop building ships. His company remained in existence though, following other entrepreneurial pursuits. Fung's strong work ethic remained and he went to the office every day until his death in 1992.
The work crew gambling during lunch
A William Garden designed Porpoise under construction
A deck view of the Porpoise
Vessel and construction crew
Cynthia and Ah Shing, Robin Fung's assistant
So to that end, I want to thank Robin Fung for his contribution to the wooden boat community. He built some of the best Garden designs around. William Garden praised his work above all others in quality, as have the previous owners of Drumbeat. Though he may no longer be with us, his legacy will remain for many years to come through the stories his family tells and through his craftsmanship found in every vessel he constructed. Cheers!
If you have fond memories of your R. Fung boat or know more about his life and would like to share, please feel free to comment below! I'd love to know more!!